This course is a continuation An Introduction to Research Computing at York. If you are new to Linux command line we recommend you go through the steps of An Introduction to Research Computing at York first before moving to this.Viking.
There is also a video demoing how to use Viking taken from the research coding club meeting here
| Table of Contents | ||
|---|---|---|
|
Before you login to Viking
Viking Account Creation
Before you can access Viking you will to create a Viking account. The process can take a couple of days please complete the following steps
- Before logging into Viking please ensure your project supervisor fills in this form to request a project code.
- The user then needs to fill in this form to request an account once they have a project code.
- Accounts should take no longer than 24 hours to be created. You will receive an email on creation of your account.
...
| Section | ||||||||||
|---|---|---|---|---|---|---|---|---|---|---|
| ||||||||||
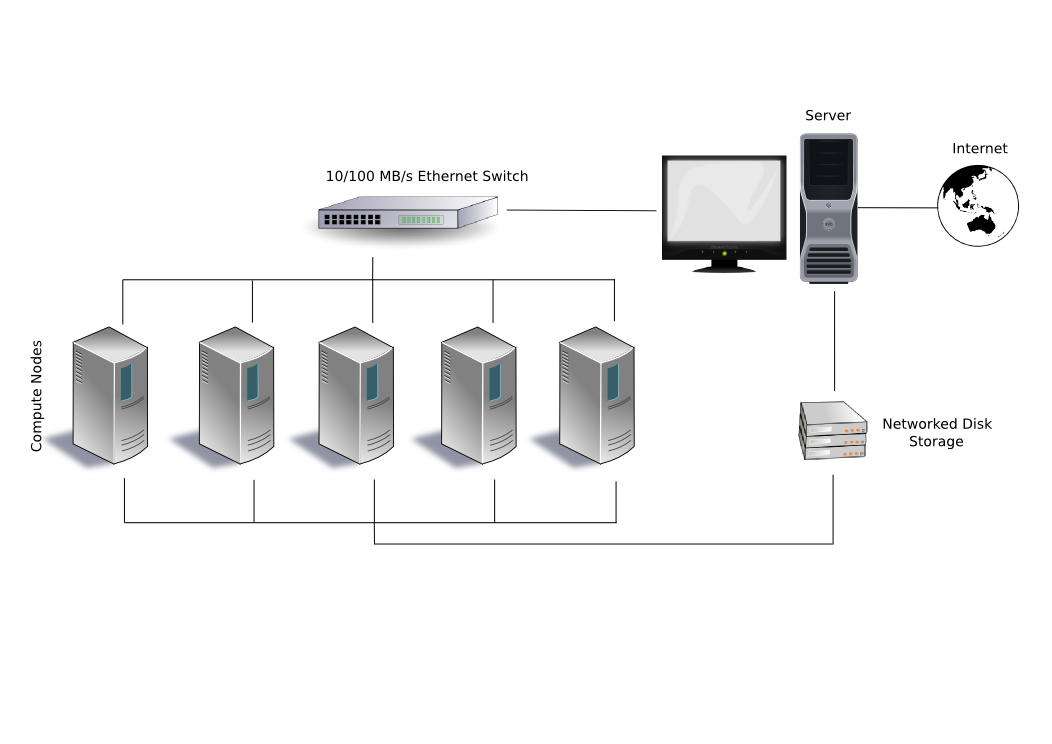
If you are finding that your code is still taking a long time to finish or you wish to scale your work, the Viking cluster may be what you need. Viking is a large Linux compute cluster aimed at users who require a platform for development and the execution of small or large compute jobs. Viking is a multidisciplinary facility, supporting a broad spectrum of research needs, free at the point of use to all University of York researchers. Viking is as much a facility for learning and exploring possibilities as it is a facility for running well-established high-performance computing workloads. In this light, we encourage users from all Faculties, backgrounds and levels of ability to consider Viking when thinking about how computing might support their research. What is a cluster?
|
Login into Viking
The process of logging into Viking is similar to the research servers as described in An Introduction to Research Computing at York. Viking has a Linux Operating system therefore how you access Viking will depend on what your operating system is on your local machine.
...
| title | We will break down the different options here. |
|---|
| Section | ||
|---|---|---|
| ||
Before You LoginIf you have not changed your IT Services password since August 2013 then you must do so before you will be able to login. All user password changes are manage via the My IT Account web page. Click on the Password Management (IDM) link in the Manage Your Password field to change your password. You may be given the option to 'synchronise' your password; please use this option if you do not want to change your password. The password change (or synchronisation) may take a few minutes before it is visible to the servers. Accessing Viking off campusTo access the Viking off campus you can either use the Virtual Private Network - VPN or the SSH gateway service (registration required). The instructions below should work if you log on through the VPN; the SSH service works slightly differently. |
| Expand | ||
|---|---|---|
| ||
Access from a Windows desktopCommand-line access using PuTTYPuTTY is available on all IT Services Managed Windows systems. It is pre-installed on Classroom PCs; on Office PCs you can install it from Run Advertised Programs / Software Center. It appears under "Internet Tools" on the start menu. On unmanaged PCs you can download the installer from the PuTTY Website. Configuring PuTTY to connect to VikingOpen PuTTY and configure it to connect to Viking:
Connecting to Viking
A terminal window should appear. Log in with your university username and password. The first time you connect you will get a security alert showing the fingerprint of the server, labeled as 'ssh-rsa' or 'ssh-ed25519'.
If you are successful this is what you will see:
Whilst it is possible to configure X11 forwarding through PuTTY, X11 forwarding will only work on the Viking login nodes, which means that you won't be able to run graphical applications e.g. MATLAB on the Viking compute nodes using X11 forwarding. Details about virtual desktop sessions on Viking are provided in the Virtual Desktop section of this document. |


...
| title | MacOSX |
|---|
Access from a Mac
Go to the Finder on your Mac, find Applications, open the Utilities folder in Applications and then start the Terminal app from the Utilities folder. (You may wish to add Terminal to your Dock.) Then type the following, using your university username (abc123). You do not need to type the $; this is an example of a prompt, which tells us the terminal is ready for us to type something. You should see something similar when you open Terminal, though it may be a bit longer (it may show your username for example). Just type anything from after the $.
| Code Block | ||
|---|---|---|
| ||
[bash-4.1]$ ssh -X abc123@viking.york.ac.uk |
...
| title | Linux |
|---|
Access from a UNIX server or desktop
To log in from a terminal emulator, use the following command:
| Code Block | ||
|---|---|---|
| ||
[bash-4.1]$ ssh abc123@viking.york.ac.uk |
where abc123 is your IT Services username. You will be prompted for your IT Services password. Please note, X11 forwarding will only work on the Viking login nodes, which means that you won't be able to run graphical applications e.g. MATLAB on the Viking compute nodes using X11 forwarding. Details about virtual desktop sessions on Viking are provided in the Virtual Desktop section of this document.
If you require X forwarding, type:
| Code Block | ||
|---|---|---|
| ||
[bash-4.1]$ ssh -X abc123@viking.york.ac.uk |
See /wiki/spaces/RCS/pages/39158979 for more information
Navigating Viking
When you log in, you will be directed to one of several login nodes. These allow Linux command line access to the system, which is necessary for the editing programs, compiling and running the code. Usage of the login nodes is shared amongst all who are logged in. These systems should not be used for running your code, other than for development and very short test runs.
Access to the job/batch submission system is through the login nodes. When a submitted job executes, processors on the compute nodes are exclusively made available for the purposes of running the job.

For this exercise lets look at Viking and what is available and setup an area to run our jobs on Viking.
...
| title | Exercise 1 |
|---|
List the directories within your home area on Viking. What do you see
| Code Block | ||||
|---|---|---|---|---|
| ||||
-bash-4.1$ ls
bin  Chemistry  Desktop  examples  Experiments  intel  jobs  logs  tmp
-bash-4.1$ ls -l
total 296
drwxr-xr-x 2 abs4 csrv        4096 Jun 24 09:39 bin
drwxr-xr-x 3 abs4 csrv        4096 Jun  6 09:23 Chemistry
drwxr-sr-x 2 abs4 elecclust   4096 Mar 11 10:53 Desktop
drwxr-xr-x 3 abs4 csrv        4096 Jun 30 12:21 examples
drwxr-xr-x 5 abs4 csrv        4096 May 23 11:34 Experiments
drwxr-xr-x 3 abs4 csrv        4096 Aug 14 12:26 intel
drwxr-sr-x 3 abs4 elecclust   4096 Aug 15 12:49 jobs
drwxr-xr-x 2 abs4 csrv      266240 Aug 15 13:48 logs
drwxr-xr-x 3 abs4 csrv        4096 Aug 14 14:50 tmp
-bash-4.1$ |
Your home directory is backed up, but there are strict file and size limits in this area.
To see what space you have available run the myquota command
| Code Block | ||||
|---|---|---|---|---|
| ||||
[abc123@login1(viking) ~]$ /opt/site/york/bin/myquota
Scratch quota:
Disk quotas for usr abc123 (uid 10506):
     Filesystem    used   quota   limit   grace   files   quota   limit   grace
    /mnt/lustre  268.6G      3T    3.1T       - 2157882       0       0       -

Home quota:
Disk quotas for user abc123 (uid 10506):
     Filesystem  blocks   quota   limit   grace   files   quota   limit   grace
storage:/export/users
                2155420  52428800 78643200            1654  100000  150000
|
Here two are are displayed. Your home area and your scratch area.
Home Directory
This is the directory you start off in after logging on to one of the login nodes. It is NOT usable for large data-sets or frequent access files and no should jobs be run from here.
Lustre Fast Filesystem
This is the scratch directory in your home directory, and potentially any group data stores that you have access to. It is available to the compute nodes, and is the recommended place for your jobs to read and store data.
Here is a breakdown on the different areas and what they provide.
...
Lustre High performance filesystem.
Any data you need to keep long term should be moved to a backed up storage area. Further details on storage options can be found here.
Let us now navigate to the scratch area and create a new directory to run workloads from.
| Code Block | ||||
|---|---|---|---|---|
| ||||
[abc123@login1(viking) ~]$ pwd
/home/userfs/e/ejb573
[abc123@login1(viking) ~]$ cd scratch
[abc123@login1(viking) ~]$ pwd
/mnt/lustre/users/abc123/scratch
[abc123@login1(viking) ~]$ mkdir hpcintro
[abc123@login1(viking) ~]$ cd test
[abc123@login1(viking) ~]$ pwd
/mnt/lustre/users/abc123/scratch/hpcintro
|
We now have a new directory in scratch
Loading software
We have an entire suite of software available on Viking. We use Easybuild to install the software and a module system to help you navigate what is available.
...
| title | Here we will outline the main commands to load software on Viking |
|---|
To view all available software run
...
| width | 50% |
|---|
| Code Block | ||
|---|---|---|
| ||
[abc123@login1(viking) ~]$ module avail |
| Column | ||
|---|---|---|
| ||
|

If you want to see the versions of a particular software run:
...
| width | 50% |
|---|
| Code Block | ||
|---|---|---|
| ||
[abc123@login1(viking) ~]$ module avail Kraken2 |
| Column | ||
|---|---|---|
| ||
|

The module spider string command allows you to search for modules matching the string.
...
| width | 50% |
|---|
| Code Block | ||
|---|---|---|
| ||
[abc123@login1(viking) ~]$ module spider Kraken2 |
| Column | ||
|---|---|---|
| ||
|

To load a module type module load <module name>. You can append a version number to load a specific instance of a package. Note the <tab> key can be used to complete the command.
| Code Block | ||
|---|---|---|
| ||
[abc123@login1(viking) ~]$ module load lang/Bison <tab> <tab>
lang/Bison Bison/3.0.4-GCCcore-8.1.0
lang/Bison/3.0.4
[abc123@login1(viking) ~]$ module load lang/Bison/3.0.4-GCCcore-8.1.0 |
To list currently loaded modules type module list
| Code Block | ||
|---|---|---|
| ||
[abc123@login1(viking) ~]$ module list |
Run module purge to unload all loaded modules.
| Code Block | ||
|---|---|---|
| ||
[abc123@login1(viking) ~]$ module purge |
To unload a specific module use
| Code Block | ||
|---|---|---|
| ||
[abc123@login1(viking) ~]$ module unload |
If you need to have a program installed on Viking please email itsupport@york.ac.uk with the details.
See /wiki/spaces/RCS/pages/39159178 for more information.
Running your workloads on Viking
...
| border | true |
|---|
Viking uses a queuing system called Slurm to ensure that your jobs are fairly scheduled to run on Viking.
What is Slurm and what is a scheduler?
Slurm is a job scheduling system for small and large clusters. As a cluster workload manager, Slurm has three key functions.
- Lets a user request a resources on a compute node to run their workloads
- Provides a framework (commands) to start, cancel, and monitor a job
- Keeps track of all jobs to ensure everyone can efficiently use all computing resources without stepping on each others toes.
When a user submits a job Slurm will decide when to allow the job to run on a compute node. This is very important for shared machines such as the Viking cluster so that the resources are shared as fairly between users so one persons jobs does not dominate.
Resource allocation
In order to interact with the job/batch system (SLURM), the user must first give some indication of the resources they require. At a minimum these include:
- how long does the job need to run for
- on how many processors to run the job
The default resource allocation for jobs can be found /wiki/spaces/RCS/pages/39159441.
Armed with this information, the scheduler is able to dispatch the jobs at some point in the future when the resources become available. A fair-share policy is in operation to guide the scheduler towards allocating resources fairly between users.
Slurm commands
Before submitting a job to Viking it is useful to be introduced to useful Slurm commands.
Slurm Command Summary
The following are common commands that can be used on Viking. We will be using some of these commands in the examples going forward.
...
used to submit a job for execution in real time
...
Running Slurm commands on Viking
...
| title | Exercise 3 |
|---|
Login to Viking. Run the following command. What do you see?
| Code Block | ||
|---|---|---|
| ||
[abc123@login1(viking) ~]$ squeue |
| Expand | ||
|---|---|---|
| ||
|


You should see a list of jobs. Each column describes the status of each job
...
When you start to run your jobs
| Code Block | ||
|---|---|---|
| ||
[abc123@login1(viking) ~]$ squeue -u abc123 |
or
| Code Block | ||
|---|---|---|
| ||
[abc123@login1(viking) ~]$ squeue -j JOBID |
Will provide information on the jobs you have queued or are running.
...
Submitting jobs to the partitions on Viking.
There are two ways to run your programs on the cluster
Batch Jobs
These are non-interactive sessions where a number of tasks are batched together into a job script, which is then scheduled and executed by Slurm when resources are available.
- you write a job script containing the commands you want to execute on the cluster
- you request an allocation of resources (nodes, cpus, memory)
- the system grants you one, or more, compute nodes to execute your commands
- your job script is automatically run
- your script terminates and the system releases the resources
Interactive Sessions
These are similar to a normal remote login session, and are ideal for debugging and development, or for running interactive programs. The length of these sessions is limited compared to batch jobs however, so once your development is done, you should pack it up into a batch job and run it detached.
- you request an allocation of resources (cpus, memory)
- the system grants you a whole, or part, node to execute your commands
- you are logged into the node
- you run your commands interactively
- you exit and the system automatically releases the resources
...
| title | Exercise 2 |
|---|
In this exercise we will begin to run simple jobs on Viking.
The most basic type of job you can run is an interactive job on the command line. Type the following into the terminal
| Code Block | ||
|---|---|---|
| ||
[abc123@login1(viking) ~]$ srun --ntasks=1 --time=00:30:00 --pty /bin/bash |
What do you see?
| Code Block | ||
|---|---|---|
| ||
[abc123@login1(viking) ~]$ srun --ntasks=1 --time=00:30:00 --pty /bin/bash
srun: job 6485884 queued and waiting for resources
srun: job 6485884 has been allocated resources
[abc123@node069 [viking] ~]$ pwd
/users/abc123
[abc123@node069 [viking] ~]$ echo "hello" exit
hello
[abc123@node069 [viking] ~]$ exit
exit
[abc123@login1(viking) ~]$ |
| Code Block | ||
|---|---|---|
| ||
[abc123@login1(viking) ~]$ srun --ntasks=4 --time=00:30:00 --pty /bin/bash
srun: job 6485885 queued and waiting for resources
srun: job 6485885 has been allocated resources
[abc123@node071 [viking] ~]$ |
You may find you have to wait before your job is running.
The above example creates a single task (one core) interactive session in the default partition "nodes", with a 30 minute time limit. The second example creates a four task (four cores) session.
To terminate the session, exit the shell by typing "exit" and pressing enter.
When there is resource available you will be placed directly onto a compute node, in the above cases node069 and node071. Here you can run your workload as normal.
These sorts of jobs can be useful but you will have to run each one separately with manual intervention. If you have many jobs to run the best method would be to use a slurm job script.
Job scripts
...
| title | Here will show you have to submit and check a simple slurm job |
|---|
To submit a job to the queue you will need to create a submit script.
...
| title | Example job script |
|---|
| Code Block | ||
|---|---|---|
| ||
#!/bin/bash
#SBATCH --job-name=simple                # Job name
#SBATCH --mail-type=BEGIN,END,FAIL       # Mail events (NONE, BEGIN, END, FAIL, ALL)
#SBATCH --mail-user=abc123@york.ac.uk    # Where to send mail
#SBATCH --ntasks=1                       # Run on a single CPU
#SBATCH --mem=1gb                        # Job memory request
#SBATCH --time=00:01:00                  # Time limit hrs:min:sec
#SBATCH --output=basic_job_%j.log        # Standard output and error log
#SBATCH --partition=nodes				 # Job queue
#SBATCH --account=PROJECTCODE            # Project account


module purge							 # purge any loaded modules
module load lang/Python/3.7.0-foss-2018b # Load a module within a job script

echo My working directory is `pwd`
echo Running job on host:
echo -e '\t'`hostname` at `date`
echo
echo
echo Job completed at `date` |
To Submit a job run
| Code Block | ||
|---|---|---|
| ||
[abc123@login1(viking) ~]$ sbatch simple.job
|
To see your job in the queue run the squeue commnd. The job running below has a jobid of 147875
| Code Block | ||
|---|---|---|
| ||
[abc123@login1(viking) scratch]$ squeue -u abc123
JOBID  PARTITION NAME     USER ST TIME NODES NODELIST(REASON)
147875 nodes simple.j abc123 R 0:04 1 node170 |
To delete a job from the queue use the scancel [options] <jobid> command, where jobid is a number referring to the specified job (available from squeue).
| Code Block |
|---|
[abc123@login1(viking) scratch]$ scancel 147876
|
A user can delete all their jobs from the batch queues with the -u option:
$ scancel -u=<userid>
To look at your job history run sacct -j jobid
| Code Block |
|---|
[abc123@login1(viking) scratch]$ sacct -j 147876
JobID        JobName    Partition  Account    AllocCPUS  State      ExitCode
------------ ---------- ---------- ---------- ---------- ---------- --------
147876       simple.job nodes      dept-proj+ 1          CANCELLED+ 0:0
147876.batch batch dept-proj+ 1 CANCELLED 0:15 |
See /wiki/spaces/RCS/pages/39159024 and /wiki/spaces/RCS/pages/39167429 for more information.
Copying your data to and from Viking
You may have data stored elsewhere that you wish to copy to Viking. There are different ways to do this
| Expand | |||||||||||||||||||||||||||||||||||||||||||||||||||||||||||||||||||||||||||||||||||||||||||||||||||||||||||||||||
|---|---|---|---|---|---|---|---|---|---|---|---|---|---|---|---|---|---|---|---|---|---|---|---|---|---|---|---|---|---|---|---|---|---|---|---|---|---|---|---|---|---|---|---|---|---|---|---|---|---|---|---|---|---|---|---|---|---|---|---|---|---|---|---|---|---|---|---|---|---|---|---|---|---|---|---|---|---|---|---|---|---|---|---|---|---|---|---|---|---|---|---|---|---|---|---|---|---|---|---|---|---|---|---|---|---|---|---|---|---|---|---|---|---|
| |||||||||||||||||||||||||||||||||||||||||||||||||||||||||||||||||||||||||||||||||||||||||||||||||||||||||||||||||
There are different ways to copy your data dependent on which operating system you use on your local machine.
Running WinSCPSection |
Section |
Section |
Section |
Expand |
Copying Files To/From a Linux/MacOS desktopThere are a number of ways to copying files and directories using Linux command line. you can copy your data from any Linux device to Viking using the following commands
Here are a couple of examples.
RSYNC
|


Help and support
In the first instance check our wiki pages or email itsupport@york.ac.uk where one of our team will be in touch.
...