| Info |
|---|
| This course has been designed to help users access the research/teaching and Viking Linux servers. The aim is to provide you with some basic Linux commands to get you going. You can access these machines using Windows, Mac or Linux. |
| Table of Contents |
|---|
Introduction
There are a number of different computing facilities available at the University of York. Have you found any of the following when doing research on your own computer?
| Panel | ||||
|---|---|---|---|---|
| ||||
|
We have a few different machines to use when you have these problems: individual large machines known as the research and teaching servers, and the Viking compute cluster, a connected group of hundreds of machines. Here will will give you a very brief introduction on how to access these machines.
The research and teaching servers
These servers are also known as the Linux Managed Service or LMS for short. There are currently four research servers (research0, research1, research2 and research3) and two teaching servers (teaching0 and teaching1). Detailed information on the server specifications can be found here. These machines are Desktops, similar to what you may have at home or in your office, but with a large number of compute cores and memory. This means that work that your local machine is struggling with may easily be run on one of these machines. You can log on to these machines from anywhere on campus, or off campus if you use the Virtual Private Network (VPN) or SSH gateway service. Some caveats:
- They are a shared machine which means a number of users may be logged on at the same time
- They run Linux so you need a little bit of Linux command line knowledge to get started
- If you are an undergraduate you will only have access to the teaching servers
- They get rebooted on the first Tuesday of every month, so any jobs running then will be killed
Exercise 1 - Logging into the research or teaching servers.
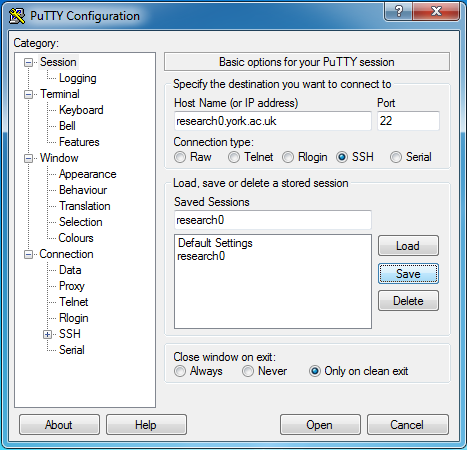
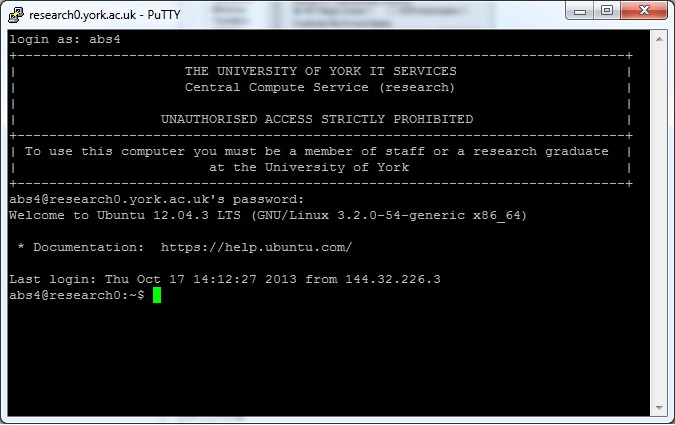
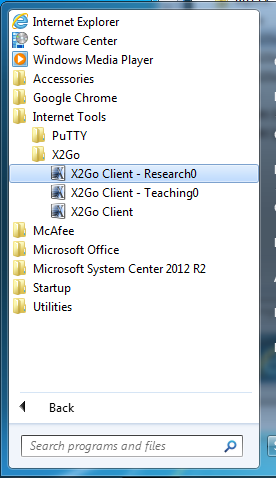
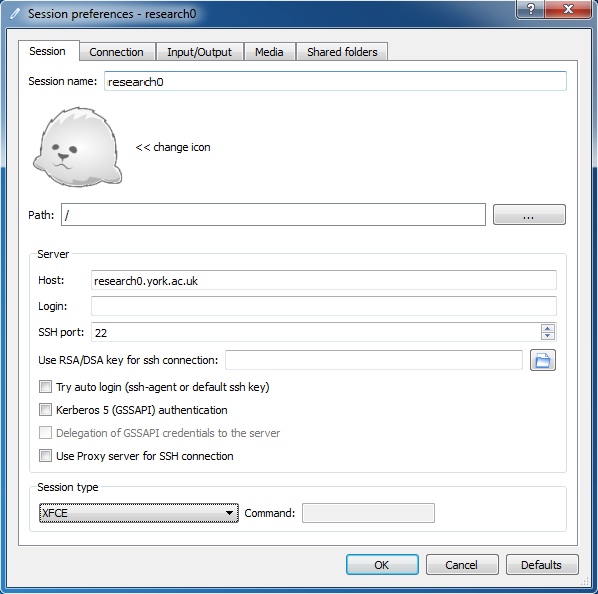
There are different ways to login to the LMS depending on what operating system you are running. We will break down the different options here.
| Expand | ||||||||||||||||||||||||||||||||||||||||||||||||||||||||||||||||||||||||||||||||||||||||||||||||||||||||||||||||||||||||||||
|---|---|---|---|---|---|---|---|---|---|---|---|---|---|---|---|---|---|---|---|---|---|---|---|---|---|---|---|---|---|---|---|---|---|---|---|---|---|---|---|---|---|---|---|---|---|---|---|---|---|---|---|---|---|---|---|---|---|---|---|---|---|---|---|---|---|---|---|---|---|---|---|---|---|---|---|---|---|---|---|---|---|---|---|---|---|---|---|---|---|---|---|---|---|---|---|---|---|---|---|---|---|---|---|---|---|---|---|---|---|---|---|---|---|---|---|---|---|---|---|---|---|---|---|---|
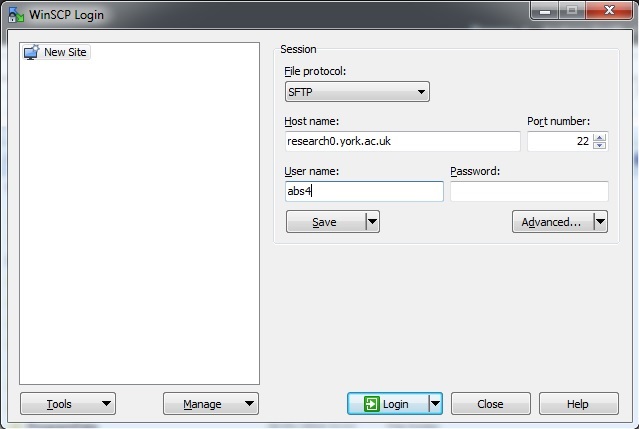
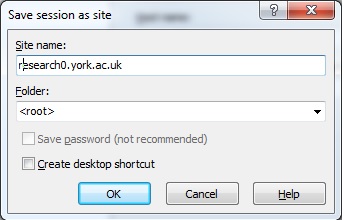
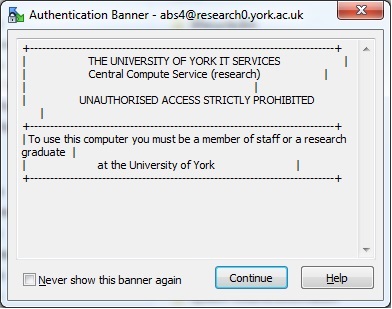
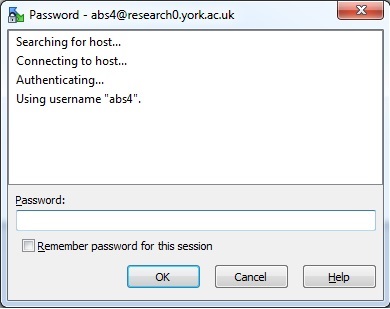
Connecting to research0
|
Using the research/teaching servers with the Linux command line interface
Once you have successfully logged into the research or teaching servers, they may look very different to what you are used to, particularly if you are used to using Windows. Please do not let this put you off. The research computing team have successfully managed to help many people use these computers who have never used the Linux command line before. It takes a bit of getting used to but the more you use it the easier and quicker it will become over time.
The command line, or shell, has been the major interface for the Unix/Linux operating system since it was first conceived in the late 1960s. The shell allows interaction with the operating system through a text based interface, rather than the graphical interface you are used to. While the graphical interface is easy to learn, and usually makes simple things easy to do, it can be hard to do complex things like operate on large numbers of files, or make different tools work together. The shell can be hard to learn, but is much more powerful and flexible than most graphical interfaces, so can be very useful for research, where we often want to try new things on large data sets.
In this tutorial, we will only scratch the surface of the shell's features, just to get you started, but we will note some further features at the end of the tutorial that you may want to look into.
The user starts the shell by logging into the computer with a userid and password:
| Code Block | ||||
|---|---|---|---|---|
| ||||
****************************************************************************** *** THE UNIVERSITY OF YORK IT SERVICES *** *** *** *** THIS IS A PRIVATE COMPUTER *** *** UNAUTHORISED ACCESS STRICTLY PROHIBITED *** ****************************************************************************** login: user001 password: Last login: Mon Sep 8 14:12:44 2014 from gallifrey.york.ac.uk -bash-4.1$ |
The last line is a command prompt and it is the means by which the computer is telling you that it is ready to accept a command from you. If you do not see the prompt, the computer is probability still executing the last command you have typed. The user types commands which take the form:
program [ options ] [ arguments ]
Roughly speaking, program is the name of the program we want to run, arguments are objects we want to process (typically data files or folders), and options modify how the program will run. Options to a command are usually proceeded by a '-' or '- -' to differentiate them from arguments. The following exercise demonstrates using the echo program with a series of arguments and the ls program with or without options.
Exercise 2 - Running commands in the Linux shell
| Expand | |||||||||||||||||||||||||||||||||||||||||||||||||||||||||||||||||
|---|---|---|---|---|---|---|---|---|---|---|---|---|---|---|---|---|---|---|---|---|---|---|---|---|---|---|---|---|---|---|---|---|---|---|---|---|---|---|---|---|---|---|---|---|---|---|---|---|---|---|---|---|---|---|---|---|---|---|---|---|---|---|---|---|---|
When you see the prompt type the following command (you can also copy and paste the command into your terminal).
What happens? The terminal should write out "I love York". echo is a small program that takes a series of arguments and repeats them to the user. Now try typing the following commands.
What do you see? Something like this?
The ls command lists all of the files in your current directory. A directory is equivalent to a folder. The ls -l command gives you a long list, showing more information about each file or folder such as who is the owner of the file, who can access it, when it was last accessed. You can use most Linux programs in a number of ways by adding extra options. Here for ls -l we added the -l option. If you need to know more about a program you can use either of the following:
ls can also take arguments as input. For example, to see the contents of a directory in your current directory, pass the name of the directory to ls as an argument. You can combine options and arguments, like the second command below:
Filesystem organisationThe file system is the component of the operating system that organises data into files. These files are organised into directories (just like directories in Windows Explorer or the Mac Finder). When you have logged in you will be placed in a directory which is called your home directory. To find the name of the directory use the program pwd (print working directory). Now try running the following commands. Here we have shown the prompt (-bash-4.1$) followed by the command to type on one line, then the output of the command on the following line (e.g after the -bash-4.1$, the first command is pwd, and the output is /home/userfs/e/ejb573; do not type the prompt as well, only the command). Your output will be slightly different as it will display the path to your home directory.
The output of the pwd command, /home/userfs/e/ejb573, is called a pathname, and this specifies the location of user ejb573's home directory. The first '/' in the pathname is called the root directory, the top-level directory in the hierarchy. Names following the '/' are directory names. Directories within directories are called sub-directories. Path names can also specify the location of files. The last part of a pathname (after the last /) is typically the name of a file or directory. The cd program lets you change your working directory to another directory in the file system. cd with no arguments places you back in your home directory. The special argument '..' means the directory above your current directory (known as the parent directory). Creating, moving and copying files and directoriesYou can create new files with the touch program and new directories with mkdir. You can move or copy files or directories to other locations with the mv (move) and cp (copy) programs. First, let's create a new file and directory.
You should now see the files afile and bfile and the directory new-dir. Let's experiment with afile and new-dir:
This example creates a new directory, 'new-dir', We then move the file 'afile' to it and create a copy of 'bfile'. We then move the file 'afile' back to our current working directory. The '.' argument in "mv new-dir/afile ." means the current working directory, so this command moves 'afile' to your working directory. Copying a directory is a little more complicated as the directory may contain files and directories. We use cp's '-r' option (recursive) to do this.
In this example we wish to copy the contents of the directory 'tmp/test' into the current directory. cp will not copy a directory; we have to use the '-r' (recursive) option to tell cp to copy all files and directories within the directory. Deleting files and directoriesYou can use the rm (remove) program is used to delete files. Please be careful with these commands, because Linux has no undo!
To remove a directory and all of its contents use the rm -r (recursive) option to the rm command. To be safe and check the files before you remove them use -ri (recursive and interactive) options.
|
Displaying and editing the contents of files
There are a variety of different tools to help you display and edit the contents of your files. We will provide some examples below but you may find other ones which you prefer to use in the future.
Exercise 3 - Displaying the contents of files
| Expand | ||||||||||||
|---|---|---|---|---|---|---|---|---|---|---|---|---|
File contents can be displayed with several different Linux programs. cat (concatenate files) will print your file to the screen, but this is not a good idea when the files are large. Instead, we can use less to view the file one screen at a time. Try them both on an existing file on the research/teaching servers (here we are using a file we already have called snark2).
To move through the file with less, or to quit back to the command line, use the following keys:
There are many text editors available on Linux. The easiest to use is probably nano:
To edit text within nano, just type; to move around the file, use the arrow keys; to exit nano, type Control+X (^X is shown in the shortcuts at the bottom of the screen); to save the file, type Control+O (^O) and hit Enter when prompted for a filename. You might explore the other shortcuts shown at the bottom to try out some other features. You might also try vi or emacs, which are harder to learn and use but very powerful once you get used to them. If you are using X forwarding (see above), you might also try gedit, which is a graphical text editor. |
Copying files and directories remotely
You may need to copy files from your machine at home to one of the research/teaching servers. There are a number of ways to do this.
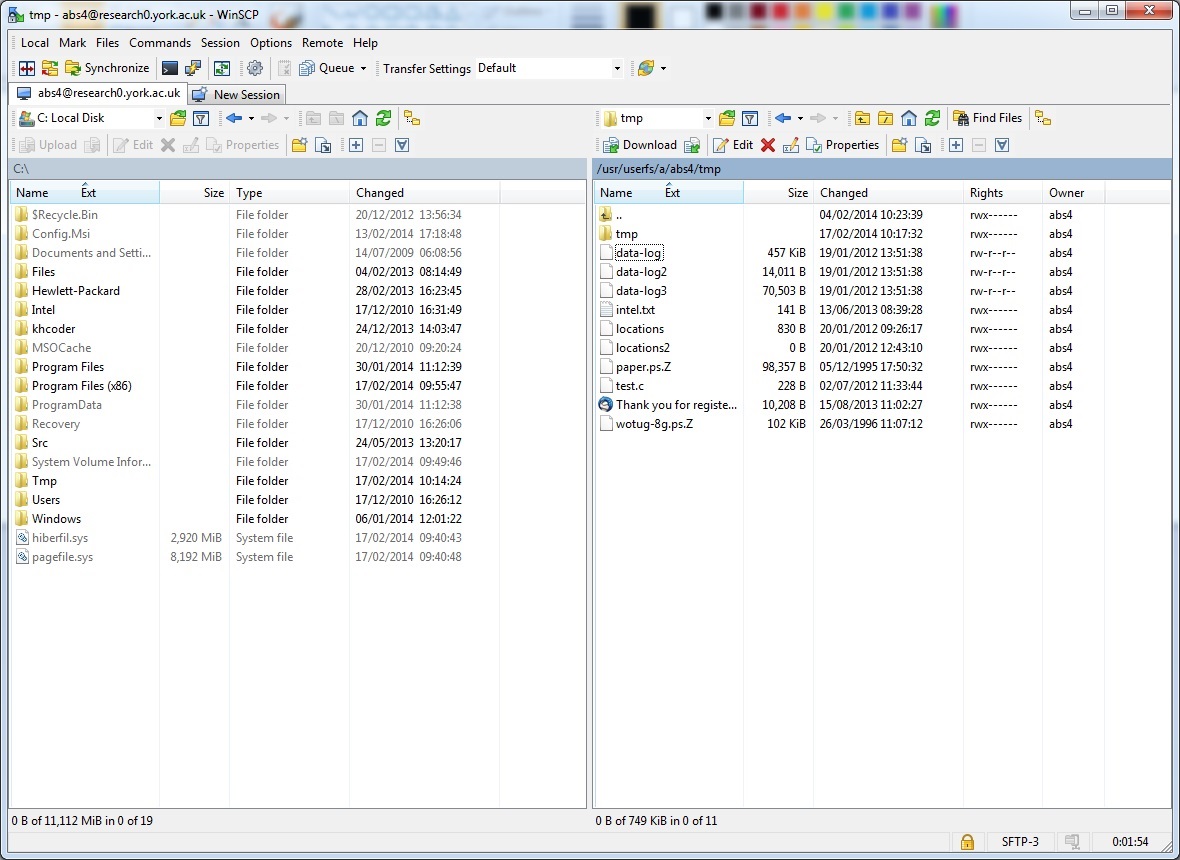
Exercise 4 - Copying files from your machine to the research machines
| Expand | |||||||||||||||||||||||||||||||||||||||||||||||||||||||||||||||||||||||||||||||||||||||||||||||||||||||||||||||||||||||||||||||||||||||
|---|---|---|---|---|---|---|---|---|---|---|---|---|---|---|---|---|---|---|---|---|---|---|---|---|---|---|---|---|---|---|---|---|---|---|---|---|---|---|---|---|---|---|---|---|---|---|---|---|---|---|---|---|---|---|---|---|---|---|---|---|---|---|---|---|---|---|---|---|---|---|---|---|---|---|---|---|---|---|---|---|---|---|---|---|---|---|---|---|---|---|---|---|---|---|---|---|---|---|---|---|---|---|---|---|---|---|---|---|---|---|---|---|---|---|---|---|---|---|---|---|---|---|---|---|---|---|---|---|---|---|---|---|---|---|---|
There are different exercises on copying files dependent on what operating system you use on your local machine.
|
Finding and running programs on the research/teaching machines
There are many programs available on the research/teaching machines. Some programs can be used all the time (like ls, scp and rsync). Some programs need to be loaded using the module system. In this next section we will try both options and show you the best way to find the program you need for your teaching or research. If you find the software you need is not installed, please email itsupport@york.ac.uk and we will aim to install the software for you.
Exercise 5 - Running applications on the research/teaching machines.
| Expand | ||||||||||||||||||||||||||||||||||||||||
|---|---|---|---|---|---|---|---|---|---|---|---|---|---|---|---|---|---|---|---|---|---|---|---|---|---|---|---|---|---|---|---|---|---|---|---|---|---|---|---|---|
Running applications on the command line.You will need to login to the research machines with X forwarding enabled. If you followed the steps in Exercise 1 you will have already set this up. From linux or MacOS ssh with the -X flag
Once logged in (either with putty or ssh) type matlab on the command line and wait for the gui to pop up.
There are a number of programs installed this way. If you have ever used linux on the classroom PCs all the programs available there are also available here. Working with modulesModules allow us to support many permutations of application versions, built with different compiler versions and technologies. We can thus support new application versions, or optimised builds, without disruption to users who still require earlier editions. There are many programs installed for use on these machines. To see what programs are available type 'module avail' in the terminal. Do you see a list of available software?
If you need to search for an application run module avail application-name on command line. How many versions of python are there available on the research/teaching machines?
Now let us load a module. On the command line run the following command
The default, system version Python version is 2.7.17. We actually want a newer version of python to run our code. Let us load a new version of Python with the module system
We have now loaded a new version of python. To check this you ran python --version. You can also use module add python/3.6.5 to add a module. To remove the module run
|
Extra Information
This has been a very basic introduction to the command line, just to get you started. You may also want to look up the following features:
- Using pipes (|) to pass the output of one tool as input to the next, allowing you to make new tools by combining existing ones
- Redirecting input and output to files with >
- Using wildcard characters such as * to refer to many files or directories at once
- Writing scripts: saving a series of commands to a text file and then running the file as a program
- Running jobs in the background with &, nohup and nice
- Variables and options for environment customisation
- Command-line editing
- Command history (quick access to previous commands)
If you wish to learn more about how to use Linux command line there are a number of online resources. We do recommend The Unix Shell - Software Carpentry, where all the exercises and answers are available online. We also have our Online training resources page which provides various options depending on where you wish to get started.
What shall I do if I need more computational power?
The Viking Cluster
If you are finding that your code is still taking a long time to finish or you wish to scale your work, the Viking cluster may be what you need.
Viking is a large Linux compute cluster aimed at users who require a platform for development and the execution of small or large compute jobs.
See our /wiki/spaces/RCS/pages/39159511 to get started. There will also be a similar online course 'introduction to Viking' available by November 2021.
What is a cluster?
| Column | ||
|---|---|---|
| ||
A cluster consists of many (hundreds or thousands) rack mounted computers called nodes. It would be similar to having hundreds of desktop computers sitting in the same room and able to talk to each other. Clusters are often accessed via login nodes, which can send jobs to the other nodes in the cluster. Your commands will not be run immediately, but will be sent to a queue, and run when there is space on the cluster to run them. The Viking cluster is Linux based and can be accessed in a similar manner to the research servers, but instead of accessing, say, research0.york.ac.uk, you would access viking.york.ac.uk. We have extensive wiki pages on how to get started on Viking. Please see /wiki/spaces/RCS/pages/39159378 for further details and if you ever need help email itsupport@york.ac.uk where one the research computing team can assist you. |
| Column | ||
|---|---|---|
| ||
| Info |
|---|
Viking is a multidisciplinary facility, supporting a broad spectrum of research needs, free at the point of use to all University of York researchers. Viking is as much a facility for learning and exploring possibilities as it is a facility for running well-established high-performance computing workloads. In this light, we encourage users from all Faculties, backgrounds and levels of ability to consider Viking when thinking about how computing might support their research. To access Viking you need a user account, and your user account needs to be associated with a project code. Project codes are typically given to research groups; ask your PI for their code, and if they don't have one, ask them to fill in the Project Application Form. Once you have a project code, you can apply for a user account by filling in the User Application Form. It can take 24 hrs for new accounts to be processed. The Viking Wiki has more help on How to access Viking. |
